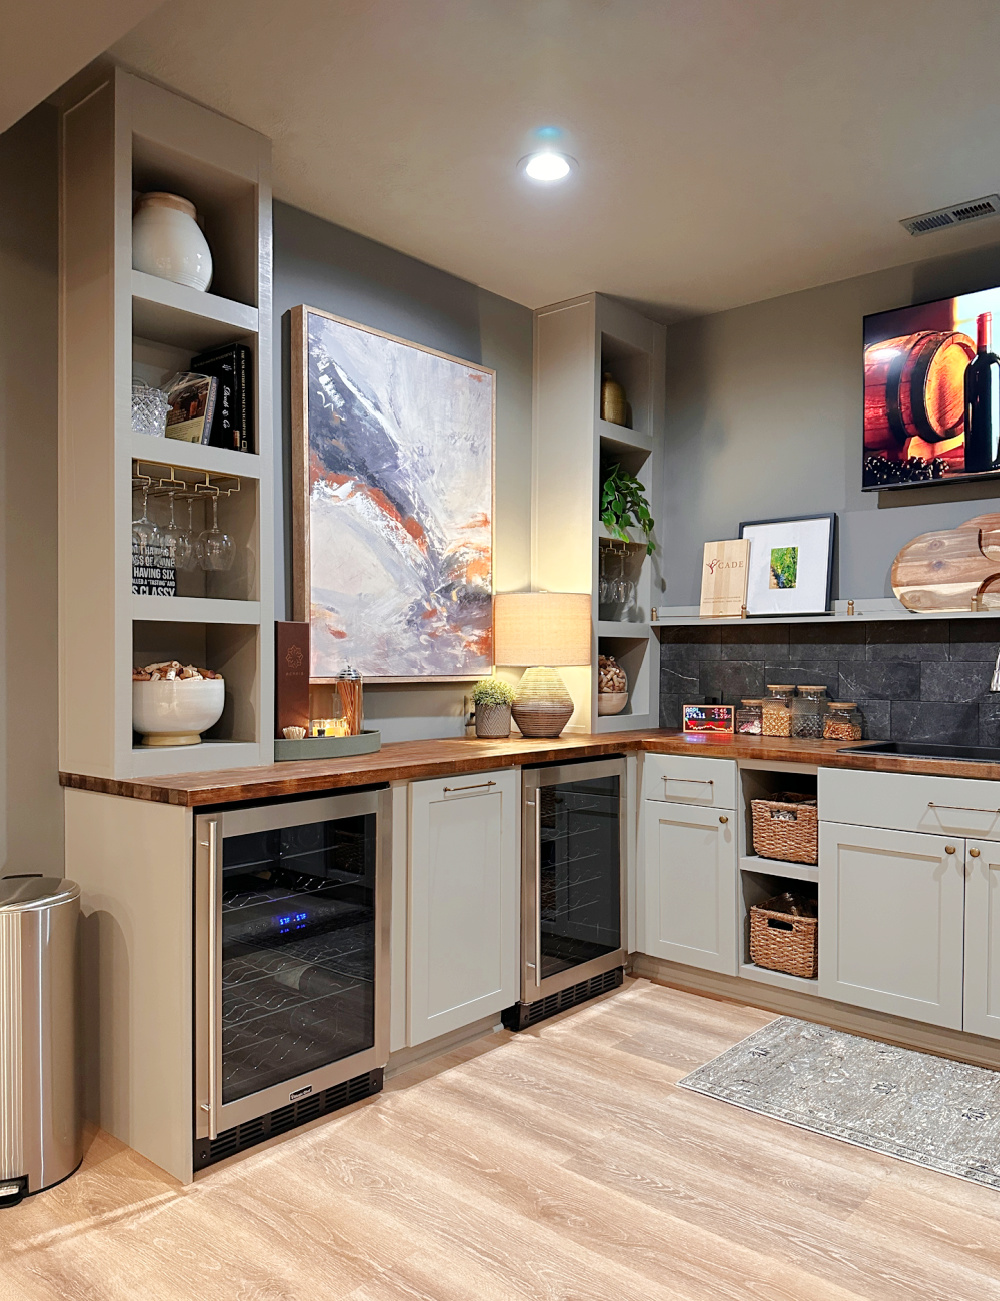
A reveal of our basement kitchenette transformation — from an empty alcove
with cement floors to a super functional space we love!
There are a few more projects to finish, but I’m calling this one DONE for
now! I’m really, really proud of the work I did in this space. I tackled a
few “firsts” and they turned out so well.
We absolutely fell in love with this layout when we walked through our
framed home all those years ago…but the basement is what completely sealed
the deal for our family.
There was a dedicated spot for a future kitchenette, and I thought we’d
tackle this spot soon after moving in.
Ha!! That did not happen. More than five years later I started working on
building this kitchen and I worked my butt off on it before the holidays
last year so we could use it during the winter months.
This is how the room looked for years:

This post may contain affiliate links for
your convenience.
I may earn a small commission when you make a purchase through links.
Because I thought we were going to finish this space sooner, I didn’t even
have our builder install carpet here. It was a pain for those five years,
but it was nice to not have to pull that up!
When our son was younger this was a great spot for coloring and
crafts.
was just a storage spot for everything that would eventually go there.
🙂

1. The kitchen plan and layout.
I knew from the start I wanted this room to be moody and cozy like the rest
of our basement. I also wanted to put this great space to good use.
my plans for this empty kitchenette
and the cabinet layout I had decided on. I threw together some very basic
graphics to show you the three sides of this room:

The only appliances we had to consider were wine fridges we already had and
a full sized fridge. We had a water line run for that when we built.
The part I was most excited about was the sink! We had that plumbing roughed
in when we built the house, so that placement was already set right in the
middle of the back wall.
I think the builder of our home meant for the kitchenette to only be placed
along the long back wall, but I knew we should take advantage of all that
space!
2. The cabinet options and what we picked.
After months researching the best cabinet options for the money,
I knew custom wasn’t going to be a consideration. So I was looking into
online and hardware store options.
I decided on unassembled cabinets because they offered all the bells and
whistles — higher quality, soft close drawers, better materials — but for
less than similar options because I would have to assemble them
myself.
Putting them together was surprisingly easy! The instructions are simple to
follow. I’ve used a lot of cabinets for projects over the years, and these
were by far my favorite:

I would 100 percent consider these for any future projects!
The cabinets were installed by contractors. I highly recommend having
professionals do this for a large project!
Contractors who are familiar with cabinet installation will know how to add
spacing between each cabinet, which is important when opening doors and
drawers.
3. Installing LVP flooring for the first time (and my thoughts).
For years I eyed a LVP (Luxury Vinyl Plank) flooring every time I walked
through Home Depot.

Once I got the hang of it, the install wasn’t too bad at all. The working on
the floor for hours part sucked, but the flooring itself was pretty easy to
install.
Not saying I ever want to do it again, but it wasn’t horrible. 🙂
Our LVP flooring has held up beautifully! No scratches, dents or water
damage so far.
4. Installing the countertops, sink and faucet.
I’ve transformed many rooms from top to bottom over the years, but there
were still a few DIY projects I hadn’t tried. That’s why I’m SO proud of
what I accomplished in this space!
I cut the butcher block down, then treated and installed the counters. After
that I cut out and inserted the sink, installed the faucet (and learned how
to add plumbing to roughed in pipes) and the garbage disposal all on my
own.
It was starting to come together!:

I can’t even TELL you how excited I was to have a working sink in that room
and that I had done it myself! 🙂
It’s been months and not one leak!
5. My backsplash pick and DIY “brass” gallery rail.
the adhesive tile mats
I love so much and then got to work on the long shelf (nine feet!) above the
backsplash:

I’ve always loved the look of a brass gallery rail on a shallow shelf —
they are so classy looking and the shiny metal is a nice touch with the
darker tones.
much
cheaper DIY tipping rail option
using items from the craft store. I LOVE how this turned out!!
6. Adding counter-to-ceiling built ins.
This space is a great size! I could have gone with upper cabinets all the
way around the room, but I knew it would be wasted space.
You know how I love some smart storage, but we don’t need quite that
much! 🙂
We only had uppers hung along the refrigerator wall, and left the other two
walls open. My husband and son insisted on a TV, so that took up most of one
wall.
be useful but also look great. One of my last projects in this space was
building these simple
counter-to-ceiling built ins:

7. Filling in that empty space above the cabinets.
I’ve always disliked that awkward empty space between the top of upper
cabinets and the ceiling, at least when it’s such a an in between distance
like this:

This time I had to change up my method a little bit, because I wanted to
hide that space, not use it.
I made this one up as I went! 😂 Instead of making boxes for above the
cabinets, I nailed some scrap wood into the ceiling so the front pieces of
wood could nail into them:

You can barely see it here, but I also nailed a strip of wood into the top
of the cabinet so the front panels could be nailed in at the top (ceiling)
and the bottom.
This was by far my least favorite project. All the angles
suuuucked.
But it’s done!:
