Last week, I also ordered some actual gold leaf (well, the imitation stuff) to use on the insides of the pendant lights that go over the countertop on the mural wall. I didn’t get those completely finished, but here’s a sneak peek of how those are looking with the gold leaf. I also added a band of gold around the bottom outside edge, and it looks fantastic!!

So there I was with all of this extra gold leaf, and a whole wall of cabinet doors and drawers that I thought needed a bit more shine. Naturally, I had to try it on one door to see how it compared to the gold metallic marker. Well, when it comes to gold leaf, there is no comparison.
There are so many paints and pens that try to mimic the look of gold leaf, but in reality, nothing comes close. If you want the look of real gold leaf, you have to use real gold leaf. Look at the one gold leafed door compares to the door and drawer fronts with marker accent. The difference is pretty amazing!

The marker, while it does have a metallic shine to it, appears overall darker than the real metal leaf.

And the main thing that sold me was that the real gold leaf (again, I don’t mean to insinuate that it’s real gold, but only that it’s real metal leaf in a gold color) is visible from anywhere in the room, whereas the gold metallic marker accent disappears the further away you get from the cabinets.

So, of course, once I saw the difference, I couldn’t go back to the marker. I’m now in the process of gold leafing all of the doors and drawer fronts. It’s a much more time consuming process, but I think the payoff is so worth it! Here’s the process I used to add the gold leaf accent to my cabinet doors and drawer fronts. (This is a process I’ve done before on a different style of cabinets. You can see how added gold leaf accent to recessed panel cabinet doors here.)
Since these cabinet doors haven’t been finished very long, I used painters tape for delicate surfaces. I wanted the gold leaf accent to cover the outer side of the trim, and about 1/4 inch of the top of the trim. So I started by taping all the way around the trim that I added to my IKEA Veddinge doors.
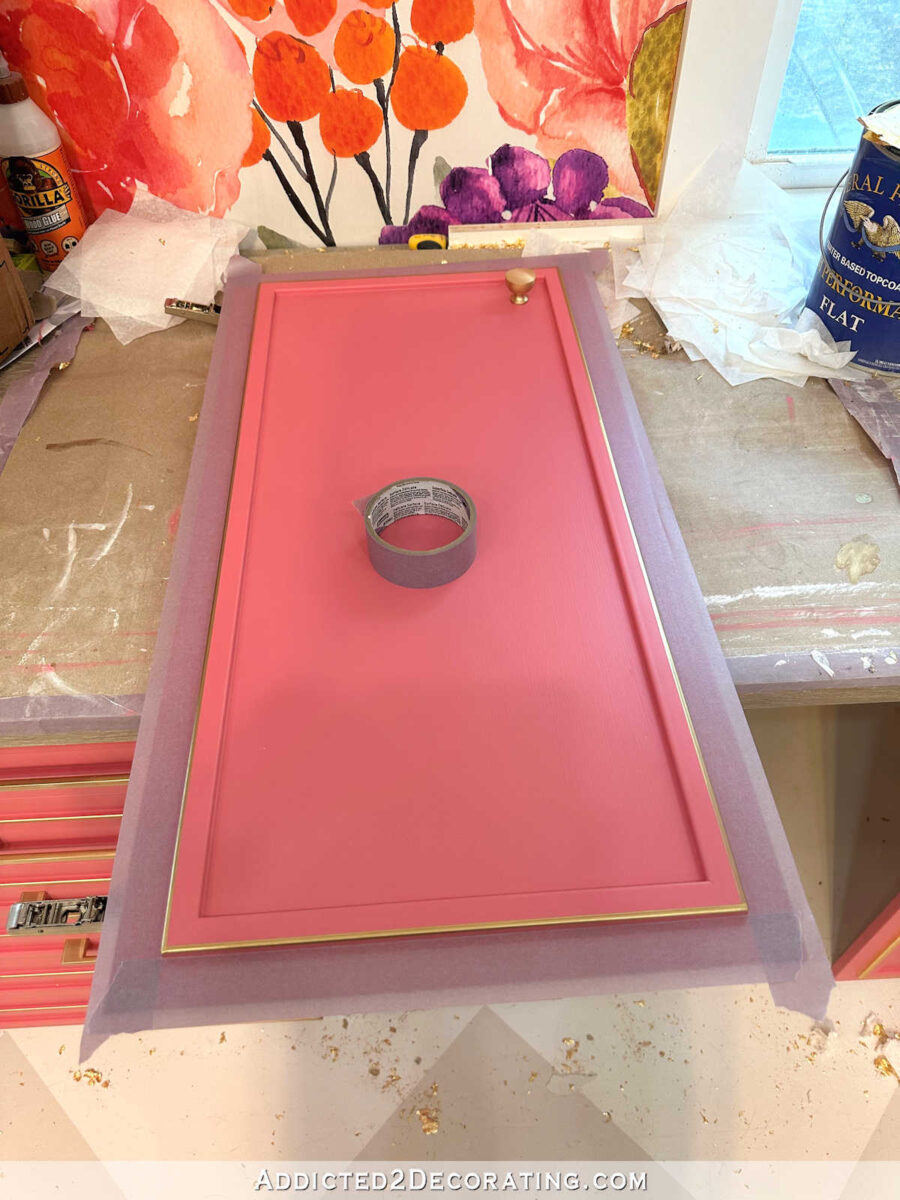
Next, I used some 1/4-inch painters tape to tape off the outer 1/4-inch of the trim. This tape was just being used as a spacer, and would be removed before I added the gold leaf.

And then just inside the 1/4-inch tape spacer, I added more of the painters tape for delicate surfaces.

To clean up those inside corners, I used my utility knife and very carefully cut at a diagonal, making sure I didn’t cut deep enough to score the painted finish.

And then I removed the extra pieces that I had cut off, and was left with mitered painters tape corners.

I put a scrap piece of painters tape over the corner to hold it together. (Since this tape is for delicate surfaces, it’s not as sticky as regular painters tape, so corners like that have more of a tendency to move or come up if they’re not secured.)

After that, I was able to remove the 1/4-inch painters tape spacer, which revealed the area that I wanted to cover with gold leaf. I used a small artist paint brush to apply the Speedball Mona Lisa Extra Thick Adhesive Size (affiliate link).

The last time I gold leafed cabinets doors, I used the regular Speedball Mona Lisa Adhesive Size. That stuff is very watery, and had a tendency to get underneath the painters tape. The super thick adhesive is still thin enough to brush on, but it’s thick enough that it won’t bleed underneath the painters tape.
I brushed on two coats of the super thick adhesive, letting the first coat dry completely before brushing on the second. The Speedball Adhesive Size goes on cloudy and dries clear and shiny. After applying two coats, and letting the second coat dry thoroughly, I applied the gold leaf. This is the imitation gold leaf I bought (affiliate link). I’ve used this several times on various projects, and I’m always very pleased with how it looks. It’s very messy, though! 😀

After I had all of the area covered with the gold leaf, I used a 1-inch artist brush to brush the whole area somewhat vigorously in order to make sure all of the gold leaf was secure and to remove any excess. The I used another brush to brush on a coat of General Finishes High Performance Topcoat in a flat finish (affiliate link). I used the flat finish because that’s what I always have on hand, but I don’t find that it makes any difference at all in the sheen of the gold leaf. Even with the flat finish clear coat, the metal leaf is still has a very shiny metallic finish.

After that top coat dried, I removed the painters tape.

I used a large dry paint brush to brush away all of the excess gold leaf, and then added one more coat of the General Finishes Topcoat to seal the edges of the gold leaf.

Once that was dry, I reinstalled the door and gazed upon the beauty of that gorgeous metallic shine. 😀

I mean, there’s just simply no comparison. Trying to imitate the look of metal will always fall short. Nothing shines like a real metal leaf.

Last week was kind of a dud for me as far as getting work done in the studio. I started off the week with a cold and felt horrible for a few days, and then I shared my cold with Matt. I was so afraid that he would end up in the hospital again, as has happened the last three times I’ve come down with something and then shared it with him. Because he has M.S., even something like a cold can be so severe for him because it can cause extreme weakness to the point that he can’t even drink water or speak.
So the latter part of last week, and over the weekend, my focus was on him and not my studio. Fortunately, his cold never turned severe, we avoided a hospital stay, and today, we’re both feeling great! So I can return to normal life this week, focus more on the studio, and hopefully see some real progress over the next few days.

Addicted 2 Decorating is where I share my DIY and decorating journey as I remodel and decorate the 1948 fixer upper that my husband, Matt, and I bought in 2013. Matt has M.S. and is unable to do physical work, so I do the majority of the work on the house by myself. You can learn more about me here.